How To Clean Your Chain And Drivetrain
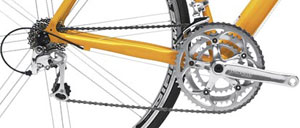
The drivetrain is comprised of the chain, crankset and derailleurs.
Sick of those grease tattoos you get on your calf every time you ride? Afraid to put your bike in the back of the car for fear you’ll slime the rich Corinthian leather? Dread fixing flats because it means dealing with the filthy chain? Well, there’s a simple solution: clean your drivetrain and then keep it clean!
Here’s how:
Required Tools:
- Repair stand or way to suspend the bike
- Rags
- Biodegradable solvent
- Lube
- Ruler
- Disposable gloves
- Small screwdriver
- Brush
- Chain-cleaner tool
Although this chain is filthy, you can see that the pin lines up
exactly with the foot mark, which means that the chain is
hardly worn at all and well worth cleaning.
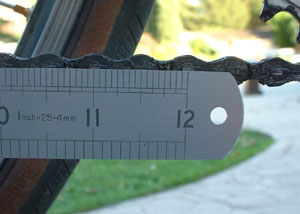
1. Check the chain for wear. If you’ve logged mega miles, the chain may be worn out. If so, rather than cleaning, you should replace it. To check, shift the chain onto the large chainring. Now, rest a ruler alongside the lower run of chain and see if you can measure exactly 12 inches between two pins (photo). If so, your drivetrain is okay. If the second pin exceeds the 12-inch mark by 1/8 inch or more, your chain is worn out and should be replaced. Keep in mind that if you use a new chain with a worn cassette, you may experience "skipping" while pedaling, which could cause a crash. This means you should replace the cassette, too.
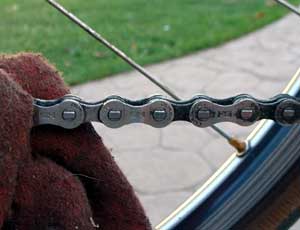
2. Wipe the chain clean. The easiest way to clean a chain is to put on some disposable gloves and wipe the links with a rag dampened in biodegradable solvent. As long as the chain isn’t really grimy, you’ll be able to wipe off the greasy mess (photo) with a few minutes of scrubbing. Remember to clean both sides and the top and bottom of the chain.
Chain cleaners are nifty all-in-one tools that brush the chain
clean in a solvent bath while you pedal by hand.
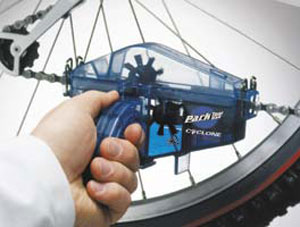
3. Scrub the chain clean. A chain caked with sludge requires more drastic measures. You can put some solvent in a bucket, place this under the chain and brush the links to dissolve the grime. By dipping often, brushing and, when the chain is clean, wiping off the excess solvent, you’ll get things spic and span. An easier way is to use a chain-cleaning tool. You fill it with solvent, snap it on the chain and pedal to brush the links clean (photo). This keeps the mess to a minimum making cleaning relatively easy.
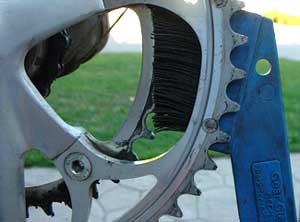
4. Clean the crankset. Lift the chain off the small ring and rest it on the frame. Clean the large chainring and the inside of the small chainring with a rag. Knock off any grimy deposits on the surfaces between the rings with a small screwdriver and then use a brush (photo) and the rag to clean off the rest.
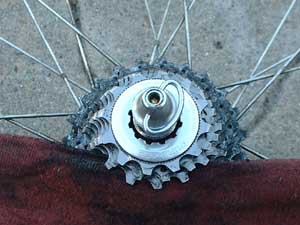
5. Clean the cassette. Remove the rear wheel and rest it on your workbench with the cassette facing up. Dampen a rag with solvent and slip it between two cogs. Use a shoe-shine motion with the rag (photo) to clean the cogs (this will rotate the cassette ensuring that you clean the cogs entirely). Then repeat with each pair of cogs until they’re clean. Reinstall the wheel.
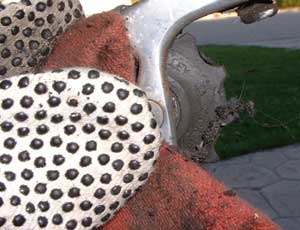
6. Check the derailleurs. Inspect the pulleys on the rear derailleur and wipe off any built-up sludge (photo). Then run a rag through the front derailleur to clean it of any grimy deposits. As a last step, apply a little lube to your chain and derailleurs.
If you have any questions about cleaning or proper lubrication, be sure to give us a call or come in. We're always happy to help!